Chapter 2 Exercises
Exercise 3: Creating a Table
The SQL commands presented so far have been relatively simple. However, you will soon see that due to the great potential for variation in the design of tables themselves, the command to create a table is more complicated.
The basic form of the command is as shown below:
Figure 2-2: The SQL structure for creating a table.

Recall from Exercise 1 the detailed breakdown of the booking table when we described it. It has five columns: id (a number), date (the date on which the booking was entered into the database), start_at (the start time of the booking), title (the title of the booking), and description (a short written description of the booking).
This time you will not be using XAMPP. Instead, you will create the table directly on the production server. Go ahead and log into phpMyAdmin at the production server. Once logged in, you will see a database called studentu_firstl (i.e., your own database where “first” is your first name and “l” is the first initial of your last name) on the left, ready and waiting to be used. Go ahead and give that database a click now. That tells phpMyAdmin that you have selected it, in order to work with it.
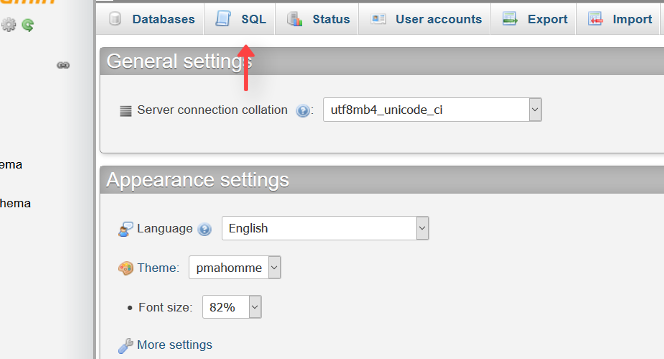
Continuing with the phpMyAdmin interface then, click on the SQL tab at the top:
Figure 2-3: The SQL tab in phpMyAdmin.

Create this table now, using the SQL command below:

This looks pretty scary, doesn't it? Let's break this command down:
- The first line is fairly simple. It says that you want to create a new table named
booking, but only if that table does not already exist. - The second line says that you want a column called
idthat will contain an integer (INT); that is, a whole number. The rest of this line deals with special details for the column. First, this column is not allowed to be left blank (NOT NULL). Second, if you do not specify any value in particular when you add a new entry to the table, you want MySQL to pick a value that is one greater than the highest value in the table at that point (AUTO_INCREMENT). Finally, this column is to act as a unique identifier for the entries in the table, so all values in this column must be unique (PRIMARY KEY). - The third line defines a column called
date, which will contain the data typedateand which, by default (DEFAULT), cannot be left blank (NOT NULL). - The fourth line defines a column called
start_at, which will contain the data typetimeand which cannot be left blank (NOT NULL). - The fifth line creates a column called
title. It will contain the title of the booking. Notice that it has a data type calledvarchar. Varchar or “variable character” is used when you don’t expect the column to ever receive a lot of text. By limiting the number of characters the column can receive (in this case, only 40 characters) you save a lot of space in your database. In this case,titlealso cannot be left blank (NOT NULL). - The sixth line is very simple. It says that you want a column called
descriptionthat will contain some text (text), and of course like the others, cannot be left blank (NOT NULL).
id will contain integers, date will contain dates, start_at will contain times, title will contain variable characters (limited to only 40 characters), and description will contain text. MySQL requires you to specify in advance a data type for each column. Not only does this help keep your data organized, but it allows you to compare the values within a column in powerful ways, as you will see later. For a complete list of supported MySQL data types, see w3schools.
Now, if you typed the above command correctly, MySQL will respond with Query OK and your first table will be created. If you have a typo, MySQL will tell you there is a problem with the query you typed and will try to indicate where it had trouble understanding what you meant.
For such a complicated command, "Query OK" seems like a pretty boring response!
Let's look at your new table to ensure it was created properly. Type the following command:

The response should look similar to the result shown in the image below.
Figure 2-4: The result of all the tables in the database.

This is a list of all the tables in your database (which is named bdb above). The list contains only one table: the booking table that you just created. So far everything seems fine. Let's take a closer look at the booking table itself.
Type:

Figure 2-5: The structure of the booking table.

As you can see, there are five columns (or fields) in this table, which appear as the three rows in this table of results. The details are somewhat cryptic, but if you look at them closely, you should be able to figure out what they mean. Don’t worry about this too much. You have better things to do, like adding some bookings to your table!
But first, let’s explore deleting a table. This task is frighteningly as easy as deleting a database. In fact, the command is almost identical. Do not proceed with actually deleting your table, unless you want to go through the steps of creating it again. Of course, it is up to you!
Note the command below to delete a table.
Figure 2-6: The SQL structure for deleting a table.


