Chapter 6 Exercises
Exercise 7: The for Loop
Loops are the final type of control structure discussed in this chapter. As suggested earlier, you use loops to execute a section of code repeatedly. You may want to create a drop-down menu consisting of the days of the month (print the numbers 1 through 31). Or you may want to print out each value of an array. For either of these cases, and many more, you can use a loop. (Note: The latter example is demonstrated in Chapter 7, Using Arrays.)
PHP supports three kinds of loops: for, while, and foreach. The while loop is similar to for, but it is used most frequently when retrieving values from a database. Foreach is related to using arrays and is introduced in Chapter 7.
The for loop is designed to perform specific statements for a determined number of iterations (unlike while, which runs until the condition is FALSE—so they are similar, but significantly different.). You normally use a dummy variable in the loop for this purpose:

The initial expression is executed once, the first time the loop is called. Then the condition is used to determine whether to execute the statements. The closing expression is executed each time the condition is found to be TRUE, but only after the statements are executed.
This may make more sense when viewing a sample for loop, as it would be syntactically executed. Here is a simple loop that prints out the numbers 1 through 10:

And rewritten as follows (assuming PHP had a GOTO method), this may further illustrate the concept to you:

This exercise will give you some practice with the for loop. You will use it to create the day drop-down menu in the HTML form.
To write a for loop:
- Using Synapse to connect to the production server, open register.html (Script 6-1) in Brackets.
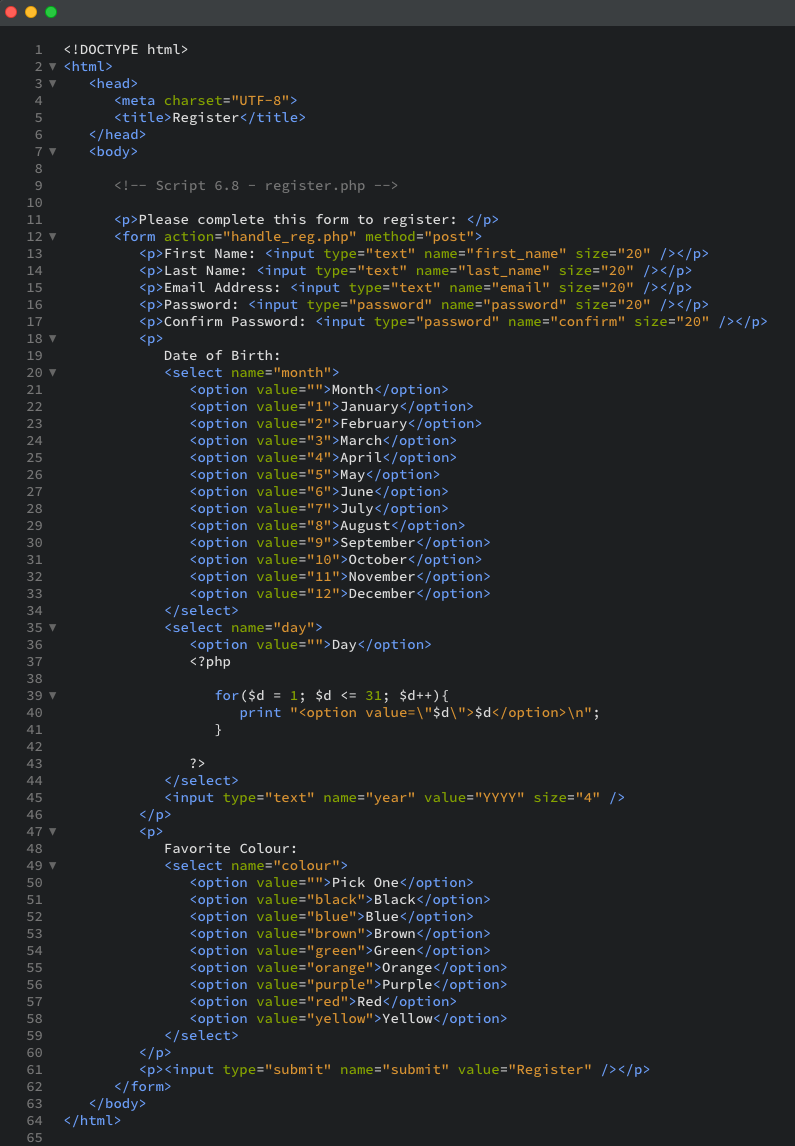
Script 6-8: You use a PHP for loop to dynamically generate the day of the month drop-down menu.

- Delete all the lines between <option value=””>Day</option> and </select> (lines 44–74 of the original script), which create the different drop-down options (Script 6-8).
- Create a new PHP section:

Because PHP can be embedded within HTML, you will use it to populate the drop-down menu. You begin with the standard PHP tag. - Create a for loop to print out 31 days as menu options:

The loop begins with creating a dummy variable called $d. On the first use of the loop, this variable is set to 1. Then, as long as $d is less than or equal to 31, the contents of the loop are executed. These contents are the print() statement, which creates code like <option value= ”1”>1</option>, followed by a return (created with \n). After this statement is executed, the $d variable is incremented by one. Then the condition ($d <= 31) is checked again, and the process repeats. - Close the PHP section:

- Save the file as register.php to your XAMPP folder (c:\MAMPP\htdocs\202\chapter6). You must save the file with the .php extension now, in order for the PHP code to be executed.
- Using Cyberduck, upload the newly created register.php file to the production server, and test in your browser (Figure 6-19), making sure you are looking at the production server version of the file.
Figure 6-19: The form looks exactly as it did before, even though PHP created some of the HTML.

- If desired, view the HTML source code (Figure 6-20).
Figure 6-20: If you view the HTML source code for the form, you will see the data generated by the for loop.


- Just as you can write the if conditional on one line if you have only one statement, you can do the same with the while and for loops. However, again please remember that this is not recommended.
- Loops can be nested inside each other. You can also place conditionals within loops, loops within conditionals, and so forth.
- Pay close attention to your loop’s condition so that the loop ends at some point. Otherwise you will create an infinite loop, and the script will run and run and run.


